🔹 Scenario A – Pullback LONG (Primary Bias, Trend-Following)
Context
H1 market structure remains bullish (BOS intact). Price is trading in premium, so chasing breakouts is not optimal. The focus is on buying pullbacks into value.
Entry (LONG)
Primary entry: 1.70 – 1.72 (POC zone, need clear price reaction)
Confirmation
LTF (5m–15m) holds higher lows
Pullback volume decreases (no sell climax)
OI stays flat or slightly decreases during the pullback
Invalidation: H1 strongly close below 1.67
Stop Loss: 1.67 (below H1 demand H1)
Targets (TP)
TP1: 1.798 (recent high / liquidity)
TP2: 1.818 (buy-side liquidity sweep)
🔹 Market Structure
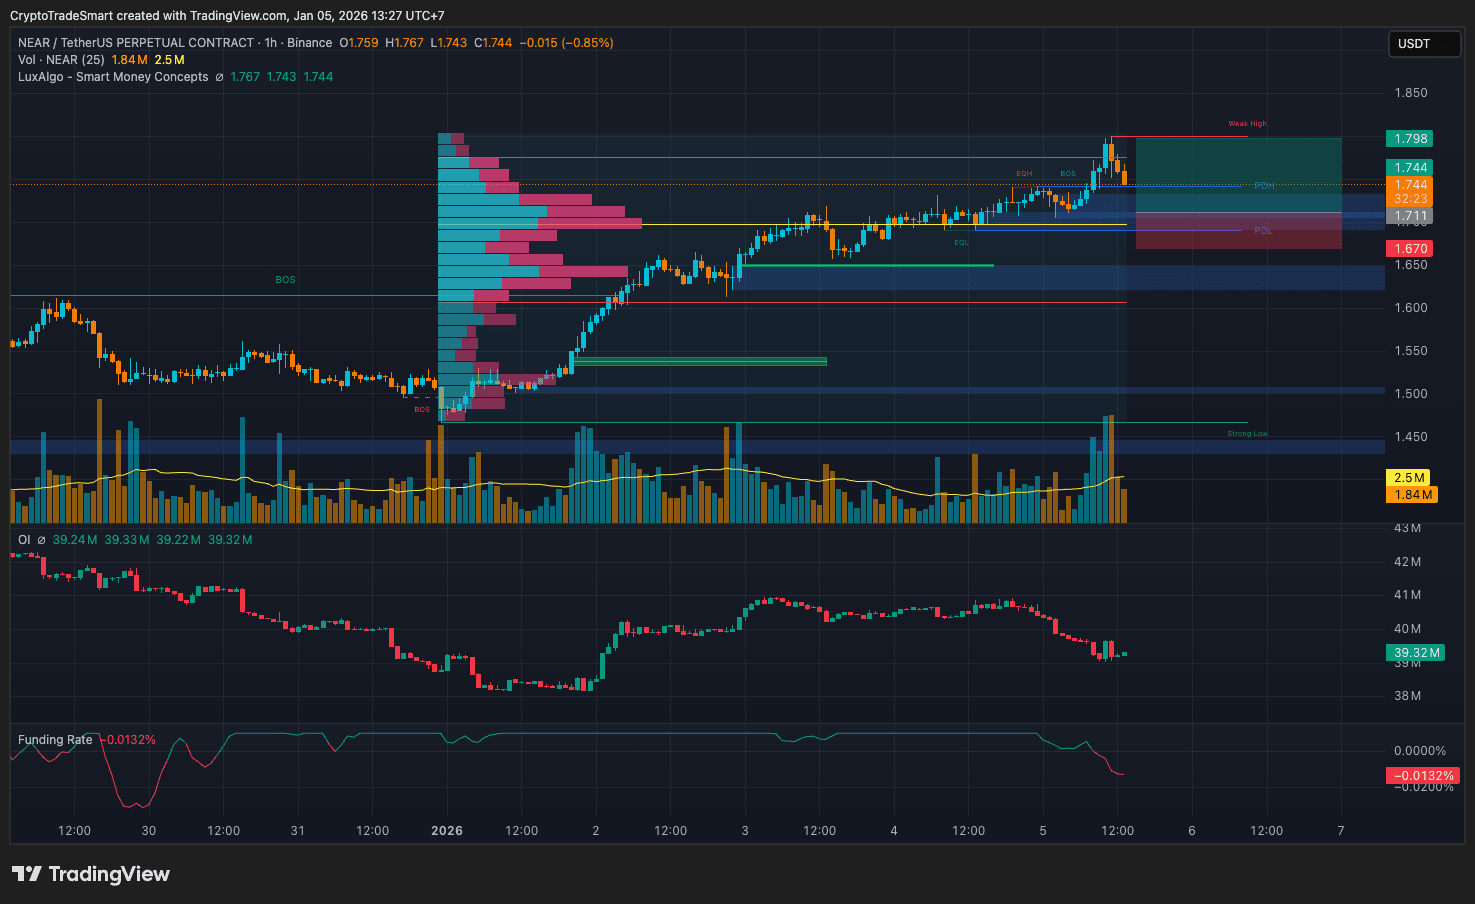
NEAR remains in a clear H1 uptrend, with multiple BOS confirmations from the 1.50 base.
Price has now pushed into the 1.77–1.80 zone, printing another weak high.
No H1 CHoCH is present yet, so the higher-timeframe structure is still bullish, but price is clearly trading in premium.
🔹 Volume & Volume Profile
The latest push above highs came with a volume spike, but candles failed to hold above the breakout level. This is a classic effort vs result signal.
Volume Profile shows price trading above the main POC, inside a low-volume area, which increases the probability of rotation back toward value rather than immediate continuation.
🔹 OI & Funding Rate
OI is flat to slightly declining while price is making new highs → no aggressive long build-up.
Funding is deeply negative, meaning shorts are paying longs even near highs. This confirms that the breakout is not driven by FOMO longs, and positioning remains fragile.
🔹 Key Price Zones
Buy-side liquidity: ~1.80 – 1.82 (recent highs, weak structure)
POC - Acceptance zone: ~1.70 - 1.72
Key demand: ~1.62 – 1.65 (H1 demand + HVN)
Strong structural low: ~1.50
🔹 Trade Scenarios
🔸 Scenario A – Pullback LONG (Primary Bias, Trend-Following)
Context
H1 market structure remains bullish (BOS intact). Price is trading in premium, so chasing breakouts is not optimal. The focus is on buying pullbacks into value.
Entry (LONG)
Primary entry: 1.70 – 1.72 (POC zone, need clear price reaction)
Aggressive entry: Rejection near 1.74 (LTF only, higher risk)
Confirmation
LTF (5m–15m) holds higher lows
Pullback volume decreases (no sell climax)
OI stays flat or slightly decreases during the pullback
Invalidation: H1 strongly close below 1.67
Stop Loss: 1.67 (below H1 demand H1)
Targets (TP)
TP1: 1.798 (recent high / liquidity)
TP2: 1.818 (buy-side liquidity sweep)
🔸 Scenario B – Rejection SHORT at Highs (Counter-trend, Tactical)
Context
Price is deep in premium with a weak high structure. Funding remains deeply negative while OI fails to expand meaningfully with price — conditions favor a failed breakout or distribution.
Entry
Primary entry: 1.78 – 1.80 (liquidity sweep followed by rejection)
Mandatory Confirmation
Clear rejection candle (long upper wick / weak close)
Volume spike with limited price expansion (effort > result)
OI remains elevated or rises slightly, but price does not continue higher
→ Indicates short build-up and potential trapped longs
Invalidation
H1 close and acceptance above 1.80
→ Valid breakout, short thesis invalid
Stop Loss: 1.83 (above liquidity sweep, avoiding stop hunts)
Targets (TP)
TP1: 1.72 (POC / first rotation zone)
TP2: 1.62 – 1.65 (H1 demand + HVN)
Note: This is a rejection / pullback short, not a momentum short.
Bottom Line
Trend is still up, but price is extended. This is late-stage price discovery, where patience matters more than aggression. I prefer to wait for pullback confirmation rather than trade emotional breakouts.
#trading #TradingSignal #futures
✍️ Written by @CryptoTradeSmart
Crypto Insights | Trading Perspectives
⚠️ DISCLAIMER:
NOT financial advice. Perpetuals trading is high risk - you can lose your entire capital. This is my personal setup for educational purposes only. Always DYOR, use strict risk management, and never risk more than you can afford to lose. You are solely responsible for your decisions.
Trade safe! 🎯
