Many blockchain networks have made creating your first stablecoin dApp more complicated than it needs to be. The @Plasma network is making sure that when you try out your first Plasma dApp, it will be very similar to creating a new Git Repository (i.e. Set up the environment for the project) - opinionated about the design, well-documented and very quick to go from an idea to a functioning application on the Plasma blockchain (on-chain). This article offers a clear practical guide to getting from "nothing" to "hello, USDT" on the Plasma Testnet, with everything being provided by $XPL (Plasma's native token).
To begin creating your first dApp, you must first prepare your development tools and environment. This includes creating a Hardhat project, installing the hardhat toolbox, and setting your hardhat.config file to point to the @Plasma Testnet RPC (e.g. https://testnet-rpc.plasma.to or an endpoint from QuickNode, Chainstack or dRPC) for the Plasma Testnet (where you will be using the Plasma Smart Contract(s) deployed on this Testnet). Be sure to set the chainId to "9746" and create an environment variable file (.env) to load your deployer's private key, this will prevent your secret key from being uploaded to version control. Once developed, add the Plasma Testnet to your wallet (e.g. MetaMask or Rabby) using the "official parameters" (i.e. Network name, RPC URL, etc.) that were outlined in this article. When the wallet is connected to @Plasma , it will work seamlessly like other EVM-compatible networks.
After you have set up your network and created an account at one of the supported Faucets, you can start using your gas. Request Testnet XPL to the address that you will be using to deploy your contracts. In just a few seconds, you will see $XPL in your wallet and you can use it to pay for deploying contracts and testing transfers. Your end users will eventually pay for their transfers using stable coins via custom gas tokens; however, for now, treat the experience of deploying contracts and testing transactions as a "sandbox" where you can spam transactions, break flows, and iterate all without risking any real money.
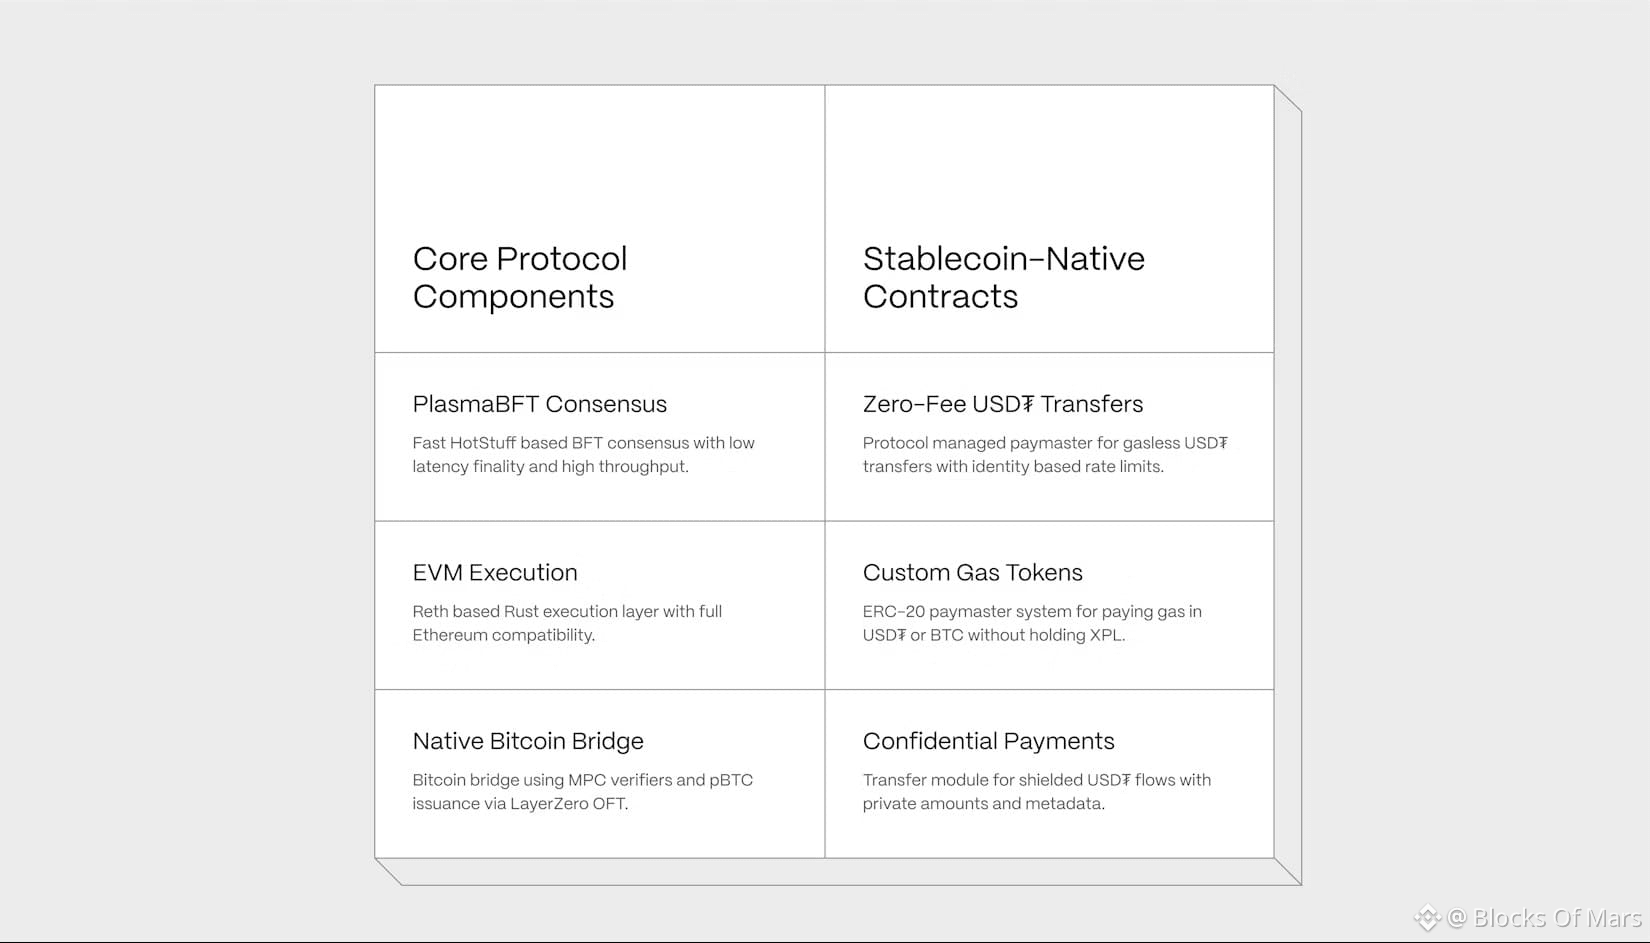
As a first step, design the simplest stablecoin-native contract that you can deploy. For example: a “Paywall” or allowance manager for a USDT-like Token deployed on the @Plasma network. Because the Plasma network is fully EVM-compatible, it is possible to create a standard open-source Solidity contract that interacts with ERC-20 Tokens via functions such as payment acceptance, balance tracking, and fee routing to a treasury. Use npx hardhat compile to compile the contract; correct any warnings displayed; confirm that you have included safe Math and access Control libraries in your contract as you are building upon the infrastructure of payments and not simply creating a toy-chain.
To deploy your dApp, you will need only one script. First, set up a new script at scripts/deploy.js (or deploy.ts), connect your plasmaTestnet.ts signer from Hardhat, and deploy your smart-contract; Hardhat will give you an address that will be the dApp’s on-chain home (hexadecimal like 0x...). Copy the address into your .env file for the frontend or use a config file, and immediately test it with your browser wallet. Send some test USDT to the address, confirm that the transaction is final in the block explorer, and run a load test on it. If you want the most natural user experience possible, you may want to add @Plasma 's stablecoin patterns (zero fee) for USDT transfers through protocol paymasters and custom gas tokens so that your users will not have to worry about “I need gas before I can pay.”
Once you’re ready for production, you can start by connecting to an existing RPC service or create your own. Some examples of leading RPC providers are Chainstack and QuickNode. You can use these RPC providers’ services to give your application higher uptime, separate your read traffic from your transaction broadcasting, and monitor your usage metrics remotely. Each of these tools gives you information about failed transactions, time taken to confirm transactions, and the cost per user action, as you build the final version of your application. $XPL serves as the underlying support for everything: paying gas fees, rewarding validators for securing the state transitions, and maintaining consistency in the changes made by your application.
Unlike other chains that call themselves “multi-purpose," @Plasma has been built specifically for developers that want to create a payment application where users can feel comfortable using their stablecoin; eventually using Bitcoin as a payment method in the same manner they would use a dollar today. With a straightforward Hardhat setup, proven, well-established RPC partners, easy access to testnet faucets, and developer-friendly, stablecoin-centric primitives, you can take a prototype created on your local machine and turn it into a payment product in a way where you don’t have to change your way of thinking. Builders that release products using @Plasma today will be the ones defining how upcoming generations experience the cryptocurrency payment process compared to yield farming methods that they see now. #plasma