In the world of decentralized technology, Walrus on the Sui blockchain is redefining what it means to own and deploy a website. It moves beyond simple file storage to create a new paradigm where your website is a sovereign, programmable, and economically secured digital asset.
This guide provides a clear pathway from concept to a live, decentralized site, focusing on the practical workflow and powerful principles that make Walrus a transformative tool for web developers.
---
Core Philosophy: The Web as a Sovereign Data Object
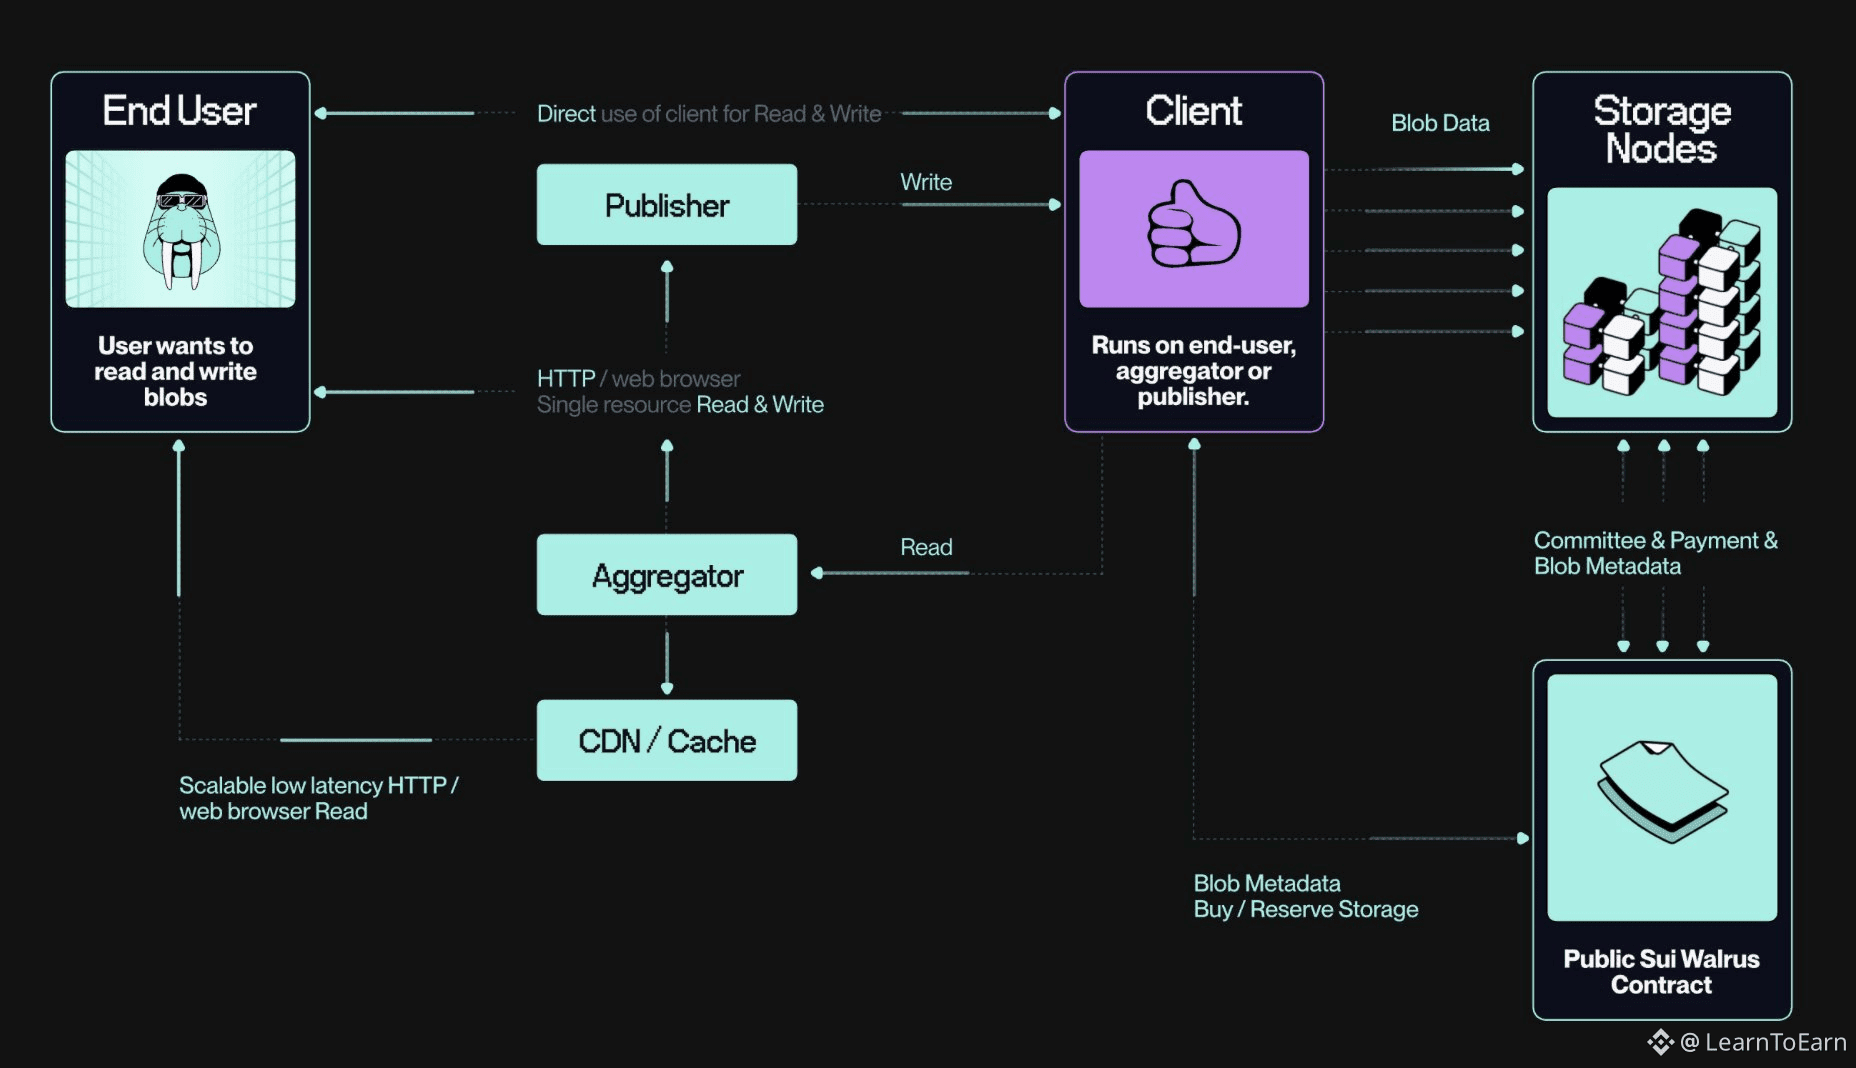
Traditional web hosting depends on rented servers and centralized control. Walrus fundamentally changes this by operating on two integrated planes:
· The Control Plane (Sui Blockchain): Your entire website is represented as a unique, sovereign object on the Sui blockchain. This object acts as an immutable title deed, recording ownership and pointing directly to the site's data.
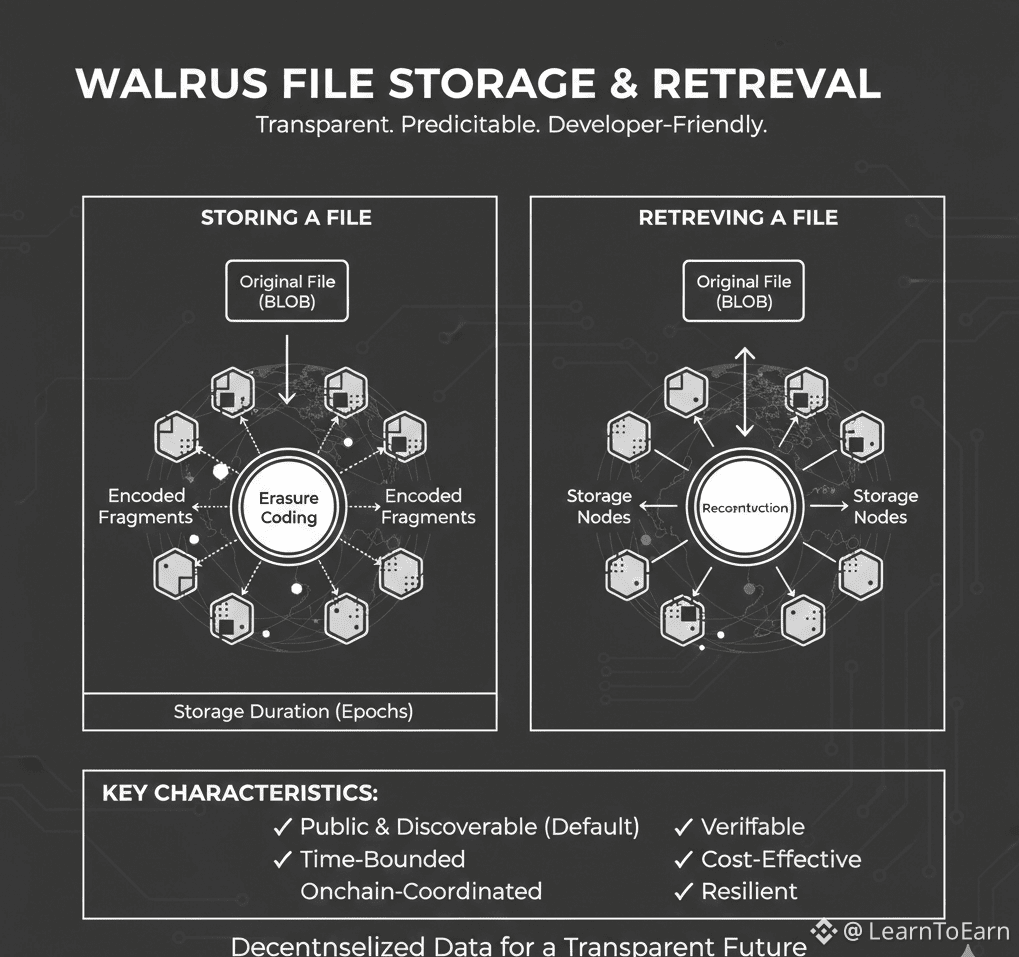
· The Data Plane (Walrus Network): Your actual website files—HTML, CSS, JavaScript, and images—are stored as decentralized, erasure-coded fragments across a global network of independent nodes. This ensures your site is resilient, always available, and free from single points of failure.
The result is a website that is serverless, tamper-proof, and cryptographically owned. It can interact with smart contracts, be linked to NFTs, and be updated or transferred with a simple blockchain transaction.
Phase 1: Foundational Setup - Preparing Your Environment
Before building, you need to set up the necessary command-line tools and a funded wallet for transaction fees.
1. Install the Essential Tools
You will need two primary command-line interfaces: the Sui client for blockchain interactions and the Walrus client for storage operations. The recommended method is to use the Sui unified installer, which simplifies the process of downloading and setting up these tools on your system.
2. Configure for the Test Network
Always begin development on the Sui Testnet, a sandbox environment designed for experimentation. Configuration involves two key steps:
· First, download the specific configuration file that tells your Walrus client how to connect to the Testnet's storage network.
· Second, initialize your Sui client to connect to a public Testnet node, and give this connection a simple alias like "testnet" for easy future reference.
3. Fund Your Developer Wallet
To perform any on-chain action, you need test tokens to pay for transaction (or "gas") fees.
· Use the official Sui Testnet faucet to request free SUI tokens sent to your new wallet address.
· Then, convert a small amount of that SUI into Testnet WAL tokens, which are required to pay for storing data on the Walrus network itself.
4. Install the Site Builder Tool
To deploy a complete static website, you will use a specialized "Site Builder" tool. This involves downloading the correct binary for your computer's operating system, granting it permission to run, and placing it in a standard directory so your system can find it. Finally, download its configuration file to define the Walrus "Sites" service settings.
Phase 2: From Files to a Live Site - The Publishing Process
With your environment ready, you can transform a folder of static files into a live, decentralized website.
1. Prepare Your Static Files
You can use any modern web framework (like Next.js or Vite) or write plain HTML, CSS, and JavaScript. The only strict requirement is a standard index.html file at the root of your project directory. For a quick start, you can clone a repository of example Walrus sites to see a working structure.
2. Execute the Publish Command
Navigate to your project's directory in your terminal. The key command uses the Site Builder tool, specifying the "testnet" context, your project folder's path, and the number of storage epochs to prepay for. One epoch equals one day of guaranteed storage on the Testnet.
3. Understand the Transaction Output
The command's output is your site's birth certificate. It provides several critical pieces of information:
· Resource Operations: A confirmation log showing each file was stored, along with its unique content-based identifier (Blob ID).
· Site Object ID: The most important identifier—the unique address of your site's control object on the Sui blockchain. You will use this to manage the site later.
· A Temporary Access URL: A gateway link where you can immediately view your newly deployed Testnet site.
4. Access and Interact with Your Live Site
How you access the site depends on the network:
· Mainnet Sites: Are accessible through the official Walrus application portal.
· Testnet Sites: Typically require you to run a local gateway portal or use a community-operated one, as a public gateway is not officially provided for Testnet.
Key Concepts in Practice
· Blob ID vs. Site Object ID: Your individual files are stored as "blobs" on Walrus, each with a unique hash. Your entire website is managed as a "Site Object" on Sui. You manage the site's lifecycle using the Site Object ID.
· Efficiency with "Quilts": The builder bundles many small files into a single storage package called a "quilt." This makes uploading faster and cheaper, though it means updating one file requires re-uploading the entire bundle.
· The Economic Layer: The WAL tokens you spent are distributed to the network of node operators and stakers who are economically incentivized to store and secure your data reliably.
Phase 3: Advanced Operations - Management and Integration
Managing a Walrus site is an exercise in blockchain-native asset management, opening doors to powerful integrations.
1. Update Your Site's Content
To make changes, simply edit your local files and run the same deploy command from the project directory. The tool automatically detects the existing Site Object via a local configuration file and creates a new transaction to update it. The wallet that signs this transaction must be the owner of the site.
2. Extend Your Site's Storage Duration
Websites on Walrus have prepaid storage. Before your allocated time expires, you can extend it by specifying your Site Object ID and the number of additional epochs you wish to purchase. This ensures your site remains live indefinitely.
3. Claim a Human-Readable Domain
You can replace the complex gateway URL with a simple Sui Name Service (SuiNS) domain (e.g., mysite.sui). The process involves purchasing a domain on the SuiNS platform and configuring its records to point to your Site Object ID. Once configured, your Mainnet site becomes accessible at a clean, branded URL.
4. Integrate and Program Your Site
This is where the paradigm becomes revolutionary. Because your site is a Sui object, it can be:
· Linked to an NFT: Create a digital collectible whose ownership grants exclusive access to a companion website or gallery hosted on Walrus.
· Governed by a DAO: Place the ownership of the site object in a decentralized autonomous organization's multisig wallet, making updates subject to community vote.
· Dynamic via Smart Contracts: Build a frontend that reads data and triggers functions on Sui smart contracts, creating a fully decentralized application where the frontend itself is hosted on-chain.
Conclusion: Building on a New Foundation
Deploying with Walrus is more than a technical exercise; it's an adoption of a new philosophy for the web. It prioritizes true ownership, verifiable availability, and deep programmability over the convenience of centralized control.
The initial setup requires familiarity with command-line tools and blockchain concepts, but the payoff is a website that is resistant to censorship and tightly integrated with the broader ecosystem of decentralized applications. As you move from static sites to dynamic dApp frontends, you are not just building a webpage—you are deploying a permanent, interactive artifact onto the world's new digital ledger.@Walrus 🦭/acc $WAL #Walrus